Documenting my latest shiny object... 3D Printing.
I plan scratch building as much as I can. I'll spend twice as much money, but learn 10x as much :)
Monday, September 9, 2013
Machining a J-Head Nozzle
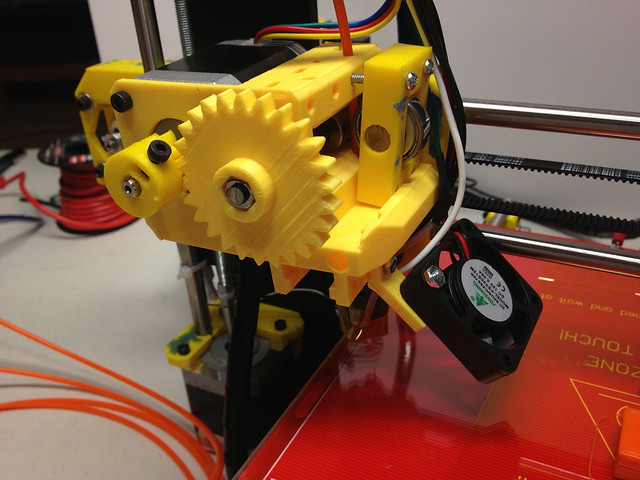
Currently I have zero parts for my 3D Printer, and I plan on making everything, just for the hell of it. Eventually I plan on building something like the Prusa i3. I'm guessing I'll build some sort of intermediate RepStrap first, who knows. After a month of reading the RepRap Wiki and forums, I decided to start with a version of the sgrabers i3ext extruder with a J-Head hot end:
This i3ext from the flickr album that sgraber links to on his Github account, and the J-Head is from the RepRap Wiki:
I'm starting with J-Head nozzle. Essentially it will be a MKVI-B, which is a MK V with a heater cartridge, instead of the heater resistor. I've ordered a few heater cartridges from china. For 5.99 for 3 of them including shipping, I figured it was worth a try.
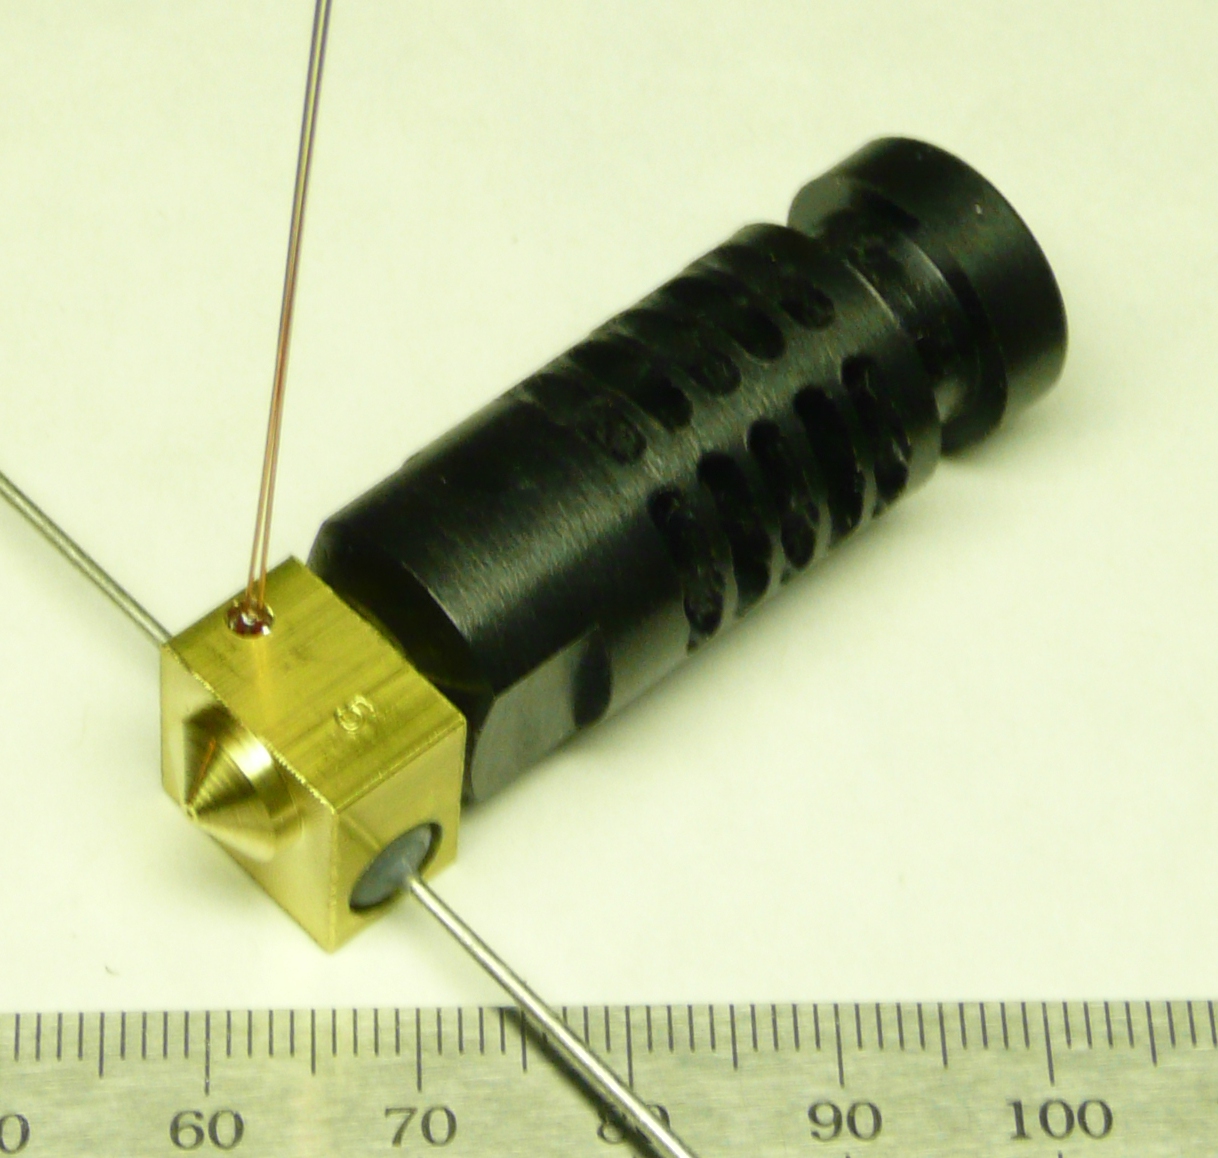
Material: Brass Bar Stock, 1/2" Square, 1.000" Long
Finished Weight: 11.3 grams
Cut a piece of brass bar stock 1 inch long plus enough to adequately hold the stock in the lathe.
On the brass bar stock, find the center of the axis of the nozzle. (The axis is centered at 0.250 +-0.001, from one edge, and 0.157 -0.000 +0.003 from an adjacent edge.) This can be done by various means ranging from using a milling machine to using marking fluid, a height gauge, and a surface plate.
Mount the brass bar stock in a 4-jaw chuck on a lathe. Adjust the chuck so that the nozzle axis is on center.
Turn the threaded end of the nozzle down to 0.3125 +0.000 -0.004. This section is 0.500 +-0.005 long.
For the first 0.150 +-0.010, of the threaded section, down to an OD of 0.255 (6.5mm) +0.000 -0.002.
Thread the nozzle to 5/16-24 up to the shoulder of the heater section.
Drill out the center of the nozzle with a 3.5mm drill bit. This will create a heat chamber that is the entire length of the brass nozzle.
Remove the work piece and mount it by the threaded end so that the threaded end is centered in the lathe.
Cut-off any excess material.
Machine the nozzle tip to the desired profile leaving the heater block section 0.325 thick.
Drill the nozzle orifice.
Using a size A drill bit, drill the heater resistor hole through the heater block section.
Drill the thermistor hole.
Even though I've been looking at pictures of J-Heads for a month, I had know idea how small they really were until I made one! The first one came out pretty bad, but after giving the lathe a tune-up, and getting some better tools I got things figured out:
I Turned down the stock, drilled/reamed the heat chamber, and threaded the nozzle. The only thing to be careful of here is the offset of heat chamber and the depth you drill. I decided to drill to a depth that leaves the outside of the drill tip flush with the "bottom" of the heater block. This way the cone of the drill extends into the nozzle nipple.
Using a 4-Jaw to offset the heat chamber.
The much improved 2nd attempt
Then I created a threaded center to hold the nozzle while I shaped and drilled the heater block and nipple. I have C5 collets, but this just made it easier to protect the threads. The center worked great, but the .35mm drill is SO small I had to place two .006" shims under the tail stock to get the drill centered on the work piece. From what I've heard it takes nothing to snap these drills. Before the shims were added I could see the drill bit "lifting", to find the center :O
NOTE: I also realized I need to leave the nipple long at this point, and face it down to reach the desired .020" thickness. See the shaping pics below.
Ready for peck drilling. With such a small drill, I turned the nozzle as fast as my lathe could go while drilling
Watch closely at the first part of the video below. You can see the drill starting to lift. I'm sure it would have snapped had I continued.
I think these .006" shims are the only thing stopped me from snapping any drills
A well centered TINY hole
I would guess I drilled through about .125" of brass without any problem.
Finally I shaped the nipple and faced the end until it was .020 thick. In order to measure this I used the back end of the reamer. It just happened to have a conical end the same angle as the bottom of the heat chamber. Basically I plugged the nozzle hole from inside of the heat chamber. I then used the dial on the tail stock to measure how far the drill could insert into the hole before hitting something solid ( the reamer). I kept removing material from the nozzle until the the tail stock indicated ~.020"
Big nipple
Little nipple, ~.020" wall thickness
If you look closely you can actually see the wall thickness (thinness) were the hole enters the heat chamber.
Twenty hours later I have a $10 part that may, or may not, work ;)


No comments:
Post a Comment